In League of Legends warding over walls is a bit wonky, this leads to there being special warding spots that are incredibly useful, but hard to know about.

BY

Warding Guide Key Takeaways

  • You can place crucial wards by abusing some weird ward + wall mechanics
  • Riot have introduced warding indicators, making this even easier now
  • There are still some wards where you are going to need to know exactly where to stand and where to click, like river to tribush
  • Easily learnable using the practice tool

Warding over walls is not very intuitive, and you can place them further than you would expect, but they are difficult to place at specific spots. Recently Riot introduced ward placement indicators that makes this much easier. But to place down certain wards quickly, you still need to know where to stand and where to place it.

These wards can be a crucial addition to your macro game and will undoubtedly help you climb in solo queue as they will help you against ganks and steals.

If you are looking for stiffer competition to play against, check out our zleague app for tournaments or finding players to play with.

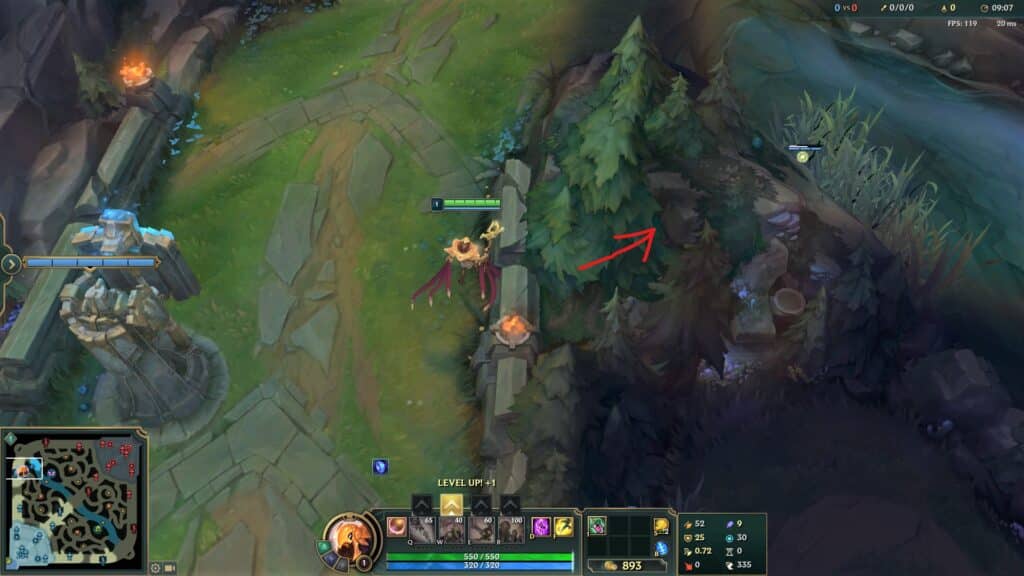
Sidelane Ward to River Bush

This ward has typically been done in the little nook, but you can place it as far back as the crack in the wall, this lineup is easy to do now with indicators . Make sure the camera is centered and put the indicator along the edge of the fir a bit above the triangle fir under the triangle rock (that’s a mouthful). You can do the lineup a bit back from the specific spot and you will walk up and place it.
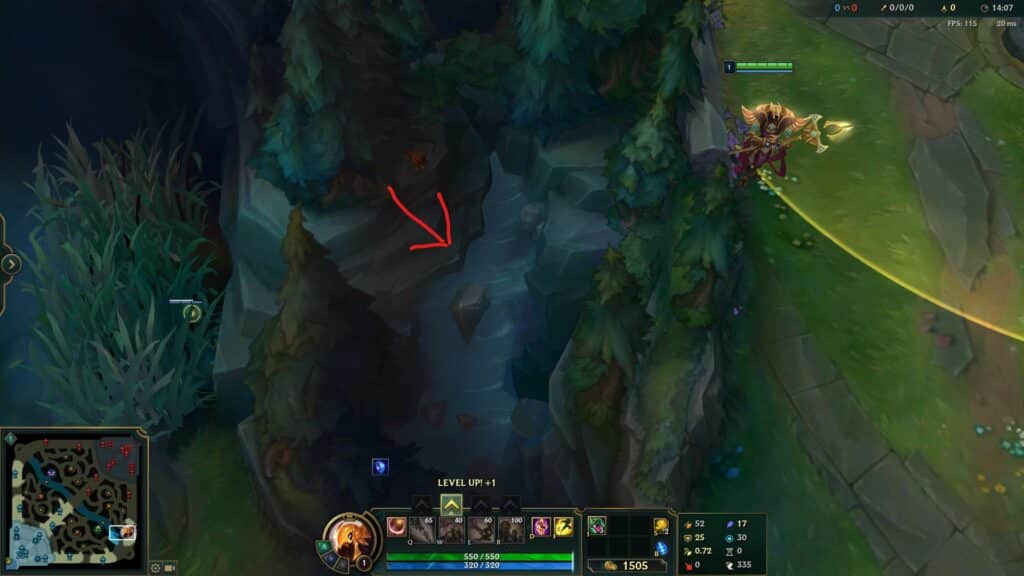
The same ward on the bot side is an easier one, you just need to place it on the edge straight above the rock in the waterfall. It’s easy to line it up even before you are in range and you will walk to it.
From objective pits to tribush

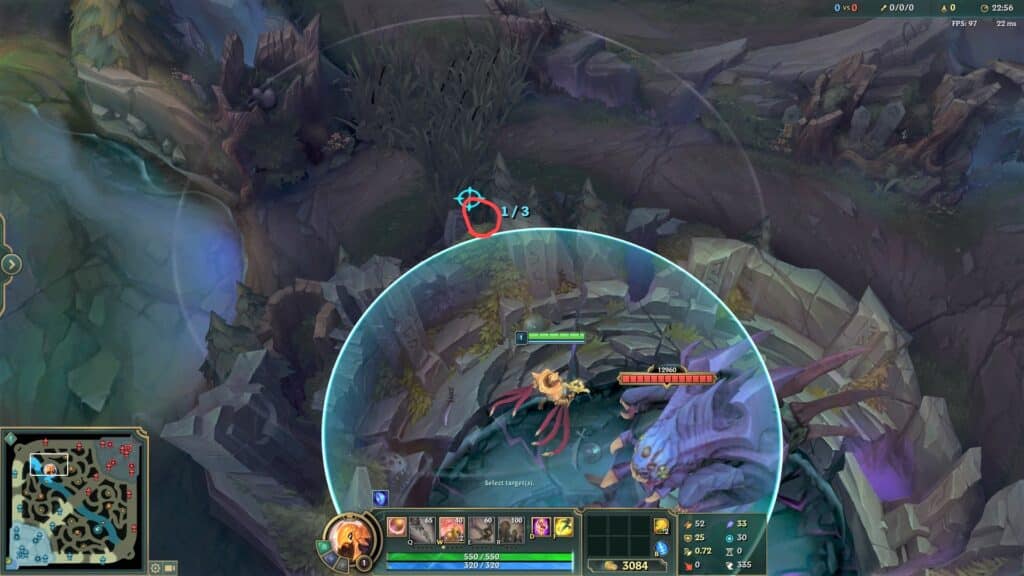
For the baron one, there are many different ways you can put this ward down, but one of the quickest and easiest is to stand by the shield and the pillar and place it in the general area of the intersection between the pillar, fir, runestone and leaves. If you just place it on the fir in that area, you won’t miss the bush. And even if you are placing it from a bit out of the wall, you will walk up.
The same ward on the dragon side is easier. Just stand by the waterfall and click on the rock between the two firs. Even easier is to just to click on the snail on the rock if you can see him.

From objective pits to normal bush

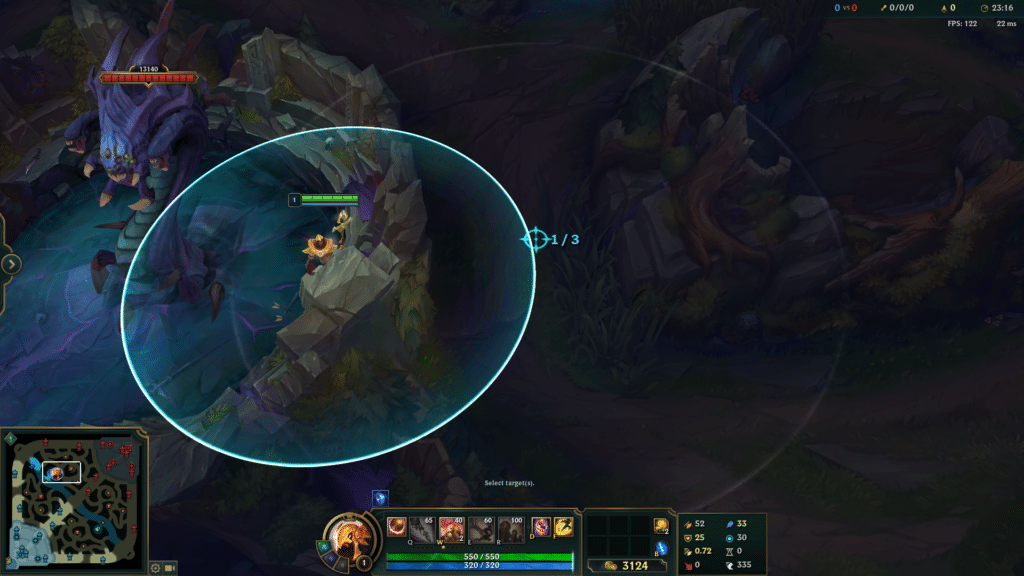
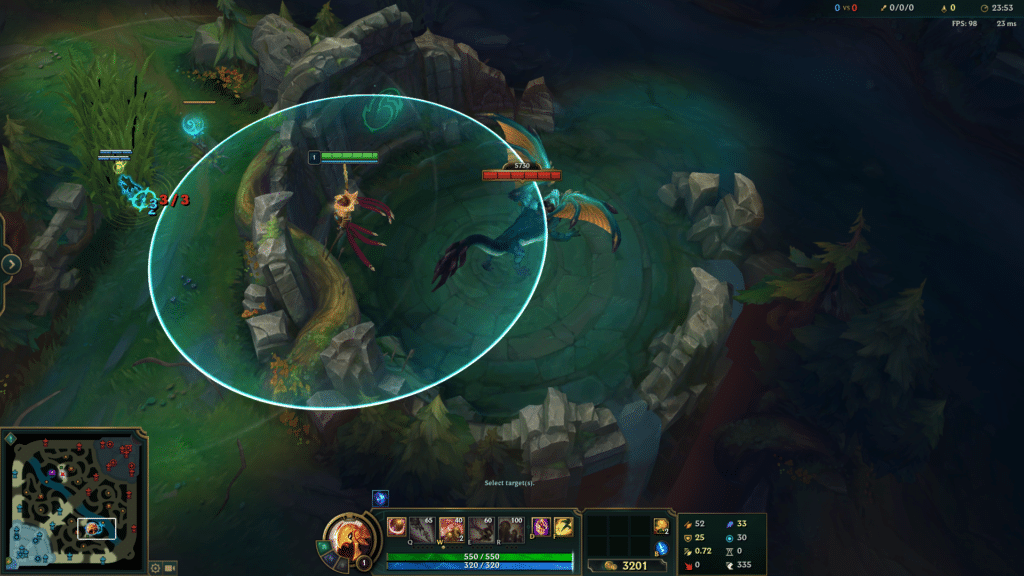
Both these wards are essentially the same, in the baron pit you want to stand in the little nook behind the rock and you want to click a bit out of the edge of the circle but not too far. Basically the area between the edge of your circle and the point where the indicator becomes green. If it’s within the circle or on the edge , it risks being placed outside of the bush, if it’s green you will walk around. So basically find the edge and move outside of it towards the bush and place it at the spot just before the indicator becomes green.
For the same ward in the dragon pit — here you want to stand next to the little pillar edge and do the placement the same way as in the baron pit.
The most unforgiving ward is the one from river to red side tribush — where you have to stand on a very particular spot in the wall and put the ward at a specific spot. You move into the little nook that’s exactly where the little markings are in the wall and you place it between two of the small rocks or on the top side of the bottom rock outside of the tribush. They are not easy to see quickly and I’ll admit I’ve never learned to consistently place this one in fog of war. Luckily this ward is pretty niche and is mainly useful against Junglers with jumps and Hexflash when you push up on blue side.
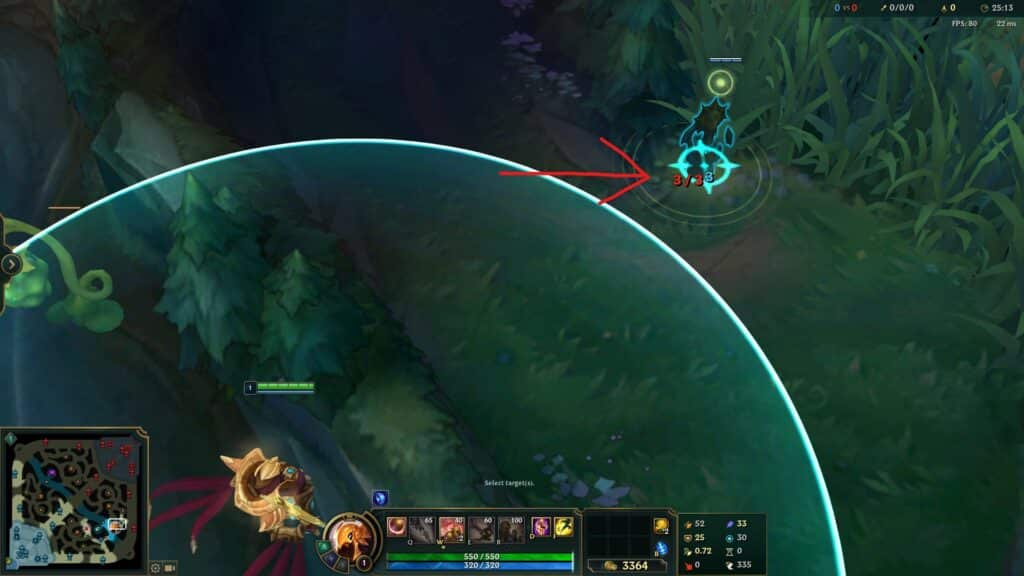
We are not aware if you can do this ward on the opposite side — nevertheless, it is not particularly useful.

The easiest way to learn these is to do them a couple of times in the practice too. Try to do them a bit quicker so they become more intuitive. Some are much more difficult than others and require a more intuitive feel to be consistently done in a match.


Lane manipulation is one of the crucial mechanics in League of Legends, but it took the scene several years to figure out, so it’s not entirely intuitive.

BY

Lane Manipulation is a crucial skill for all laners, whatever your playing style is. But many players never learn it properly or try to implement it. Here is a basic introduction to how it works.

Lane Manipulation: Key Takeaway

  • Lane manipulation is a complex macro concept
  • Few people know about it and even fewer know how to use it
  • You should know when and how you should control your wave, not just constantly hard push
  • You can set up ganks, roams, dives, vision and recalls without losing anything by controlling the wave
  • When understood, it is a very useful tool to control the lane and the game

We’ll start with some general concepts that are necessary to understand before going into specific lane manipulation. 

Focus Fire and Pulling

One wave manipulation tool is to make minions focus fire by pulling the wave, which means taking aggro and resetting it. This makes all minions focus on the same target after they reset, which will make them kill those minions very quickly and naturally start to push into you. Easiest way to force them to focus fire is to tank the minions by standing in front of them before they hit the wave and then reset by going into a bush.

Bounce and Distance

A bounce refers to the fact that when a minion wave crashes into a turret, it will naturally slow push to the other side due to being farther up in the lane. As the further up you are in lane, the more minions you need in a wave to counteract the faster reinforcements. The minions will also focus fire after killing your minions under turret. Both these factors essentially guarantee a push back.

If you are looking for a more competitive environment, players to play with or rewards for playing, take a look at our zleague app.

Fast Pushing/Hard Pushing

Fast pushing or hard pushing merely means to quickly kill the wave, getting your minions under the opponents turret. It is what people tend to do naturally. It is good if you want to keep your opponent under turret to harass them, to have priority or if  you need to quickly recall or get vision. But it is certainly overused — there is often no reason to hard push into your opponent and risk getting ganked or having your wave frozen, when instead you could let your opponent push in or hold the wave on your side of the lane.

Freezing

This is probably what you have heard about the most or you have perhaps suffered from someone doing it to you in a lane. Freezing is the act of ‘freezing’ the minion wave at a specific spot in the lane, usually done a bit in front of your own turret. This makes you very safe against ganks and makes it hard for the opponent to take cs and harass you since you and your minions will be very close to your turret.

Freezing is most easily done by leaving three caster minions alive and tanking them until your next wave arrives. But you can also thin crashing waves so as to make them have around a 3 caster advantage. The reason for 3 extra caster minions specifically is that if you have fewer, it can easily start to slowly push away from you by the fact that your wave arrives more quickly. The farther up in the lane you are trying to freeze, the more extra minions you need to keep alive to keep the freeze. You can also substitute some casters for a cannon.

The reasons for freezing is one, to make it difficult for the opponent to farm — especially for melee characters, where trying to kill ranged minions gets them almost under turret range, leaving them open to a gank as well. And two, it also puts you in a protected position as you can’t be tower dove or ganked.

The problem with freezing is that you give up lane priority — so it is not advised around objective timers or if you may need to help your team. Freezing can also be difficult to do without having control of the lane or if the opponent has strong wave-clear. It also helps to have inherent sustain when freezing as you may have to tank the minion hits.

Slow Pushing

Slow pushing refers to a slow building up of a minion wave that you can crash into the turret, which can become 2-3 waves large. The way to do this just to create a small push advantage, like through doing slightly more damage to the wave than your opponent or having the wave on your side of the map. By then not doing more damage to the wave than just last hitting, the wave pushes slowly enough that several waves will stack up. You can stack different amounts of minions in the wave depending on the distance to the enemy tower.

Why slow push? Slow pushes are relatively safe. They can start on your side of the lane and ramp up the closer you get to the opposing sides. This makes it harder to trade into you and even gank as you could potentially 1 vs 2 with 2 waves of minions. During a slow push you will also have more exp than your opponent as more of their minions have died, and at early levels you can even be two levels up when the wave crashes into the turret, giving you massive opportunities.

Slow pushes are ultimately done to either give you a longer timing window to roam, set up vision, recall or tower dive. This is due to the opponent having to clear the large wave under the turret and then the wave will bounce, so you can catch the next wave under your tower. You can also set up a slow wave ahead of time and then roam for objectives so the opponent has to choose between contesting the objectives or taking the wave. 

The downside is that slow pushes are very telegraphed so you are at risk of getting ganked when you try to get the wave under the turret as it will be on their side of the map, the opponent can also thin the wave and freeze it in front of the turret if you can’t get it to crash.

Wave manipulation is an underrated skill that is surprisingly complex and multifaceted. Even pros are negligent about it at times. As a laner, how you control the lane influences everything else — how safe you are from ganks, if your jungler can gank your lane, your roams, your priority and your farming.